
-
1. OneToMany (1 : N) : 한 명의 User가 여러 개의 FarmLog들을 가지고 있다.
-
# Entity
-
# Controller & Service
-
2. ManyToMany (M : N) : 여러 명의 User가 여러 개의 FarmLog에 좋아요를 누른다.
-
# Entity
-
# Controller & Service
-
# ThymeLeaf ( + extras-springsecurity)
-
3. ManyToMany (M:N) : User들은 서로를 팔로잉 할 수 있다.
-
# Entity
-
# Controller & Service
-
# ThymeLeaf
JPA에서 가장 중요한 개념 중 하나인 연관관계를 프로젝트에 적용시켜 볼 것이다. 부추 농장에서 프로젝트에 사용된 연관 관계들이다.
- OneToMany - 1명의 User은 여러 개의 FarmLog들을 가지고 있다.
- ManyToMany - 여러 명의 User가 여러 개의 FarmLog에 좋아요를 누를 수 있다.
- ManyToMany - 여러 명의 User가 서로를 팔로잉(following) 할 수 있다.
가장 위의 관계부터 하나씩 해나가도록 하겠다!
1. OneToMany (1 : N) : 한 명의 User가 여러 개의 FarmLog들을 가지고 있다.
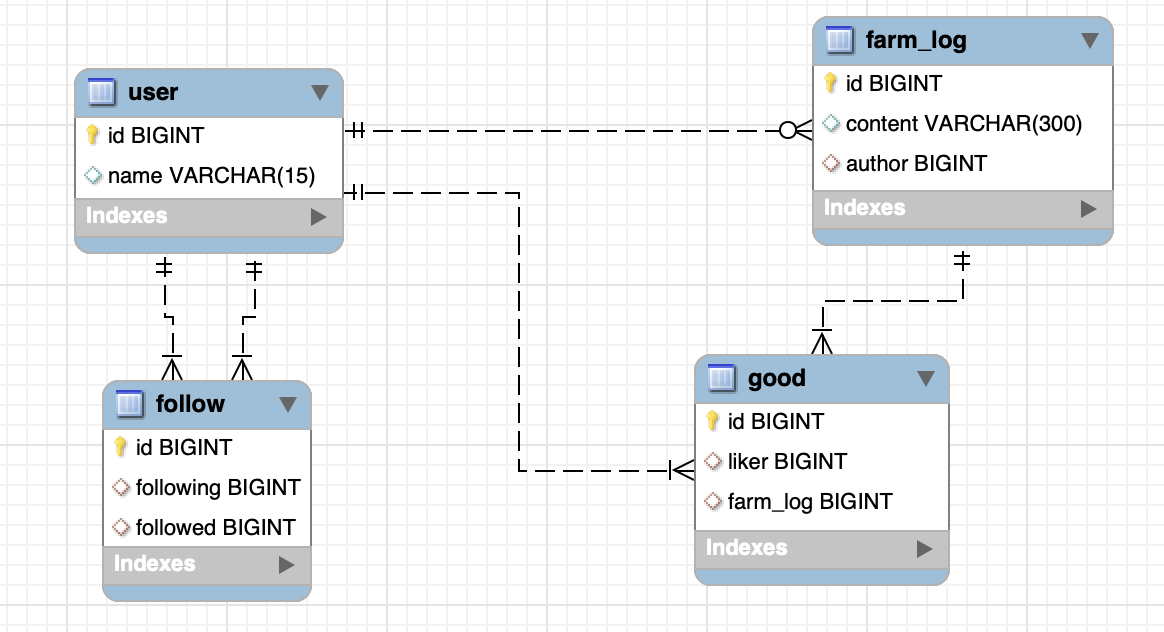
연관 관계에 필요한 property들만 ERD 으로 표시해보았다.
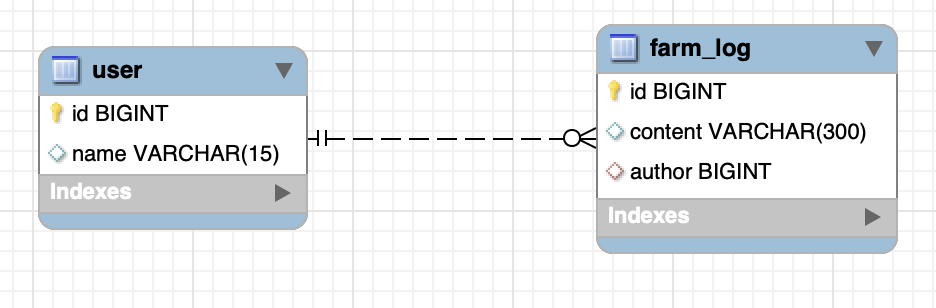
'유저가 작성한 여러 개의 농장 일기가 존재한다'는 연관 관계이다.
# Entity
연관 관계와 관련된 필드만 떼온 User 엔티티 코드이다.
@Entity
@Getter
@Setter
@AllArgsConstructor
@NoArgsConstructor
@Builder
@EntityListeners(AuditingEntityListener.class)
public class User extends BaseEntity {
    @Id
    @GeneratedValue(strategy = GenerationType.IDENTITY)
    private Long id;

    @NotBlank
    @Size(min = 1, max = 15, message = "닉네임이 공란이거나 15자 이상이어선 안됩니다!")
    private String name; // nickname

    // 유저가 가지고 있는 farmLog
    @OneToMany(mappedBy = "author",
            cascade = CascadeType.ALL,
            fetch = FetchType.LAZY)
    private List<FarmLog> farmLog;
}User 기준으로 farmLog들은 @OneToMany이다. 일단 ~ToMany 연관 관계의 fetchType이 LAZY이긴 하지만 그래도 명시적으로 적어놓았다. [farmLog들은 유저에게 완전 종속되어있다] 설정했기 때문에 CascadeType.ALL을 붙여주었다.
FarmLog 엔티티 클래스를 보자.
@Entity
@Getter
@Setter
@AllArgsConstructor
@NoArgsConstructor
@Builder
@EntityListeners(AuditingEntityListener.class)
public class FarmLog extends BaseEntity {
    @Id
    @GeneratedValue(strategy = GenerationType.IDENTITY)
    private Long farmLogId;

    @NotBlank(message = "내용이 공란이어선 안됩니다.")
    @Size(max = 300, message = "농장 일기는 300자를 넘겨선 안됩니다!")
    private String logContent;

    @ManyToOne(fetch = FetchType.EAGER)
    @JoinColumn(name = "author", updatable = false)
    private User author;
}@JoinColumn을 붙여주어 이 연관관계의 주인, 즉 fk를 가지고 있는 쪽이 FarmLog 엔티티임을 명시해줬다. 필드 이름은 author이고 이는 User 클래스의 mappedBy와 매칭된다. 일기를 쓴 주인은 수정될 수 없으므로 updatable = false 옵션을 붙였다.
양방향 매핑 + @JoinColumn을 사용한 이유는 아래 블로그 글을 참고하면 좋겠다. 간단하게 말하면 불필요한 객체 검색을 최소화하기 위해서이다.
JPA 일대다 단방향 매핑 잘못 사용하면 벌어지는 일
JPA 일대다 단방향 매핑 잘못 사용하면 벌어지는 일Parent : Child = 1 : N 의 관계가 있으면 일대다 단방향으로 매핑하는 것보다 일대다 양방향으로 매핑하는 것이 좋다. 왜 그런지 구체적으로 살펴보
homoefficio.github.io
# Controller & Service
User와의 연관 관계를 이용한 FarmLog의 CRUD 관련 컨트롤러와 서비스 코드는 아래 글 참조..
2. 농장 일기 CRUD
유저 구현은 아래 글과 똑같은 과정으로 진행했다. OAuth2 적용 (구글) 기본적인 Spring Security 내용과 OAuth2의 동작 방식에 대한 설명 글이다. OAuth에서 사용하는 클라이언트, 리소스 오너, auth 서버,
buchu-doodle.tistory.com
2. ManyToMany (M : N) : 여러 명의 User가 여러 개의 FarmLog에 좋아요를 누른다.
JPA에서 M:N 연관 관계는 @ManyToMany를 쓰는 것보다 양쪽을 참조하는 제 3의 연관 테이블을 따로 두는 편이 훨씬 좋다. 조인 테이블을 직접 추가하는 것이다.
@ManyToMany + @JoinTable 속성을 사용하면 Hibernate가 알아서 join table을 생성해주지만, join table에 추가 속성을 넣을 수 없어 그와 관련된 로직을 처리할 수 없다는 단점이 있다. 이는 여러가지 비즈니스 로직이 필요한 실무에선 치명적이므로, 반드시 join 테이블을 따로 빼야한다.
프로젝트에선 여러 명의 User들이 여러 개의 FarmLog들에게 좋아요를 할 수 있는 상황이다. 여기선 (user, farmLog) 쌍을 가지고 있는 "좋아요" 테이블을 새로 만들어야 할 것이다. 이를 ERD로 그려봤다.
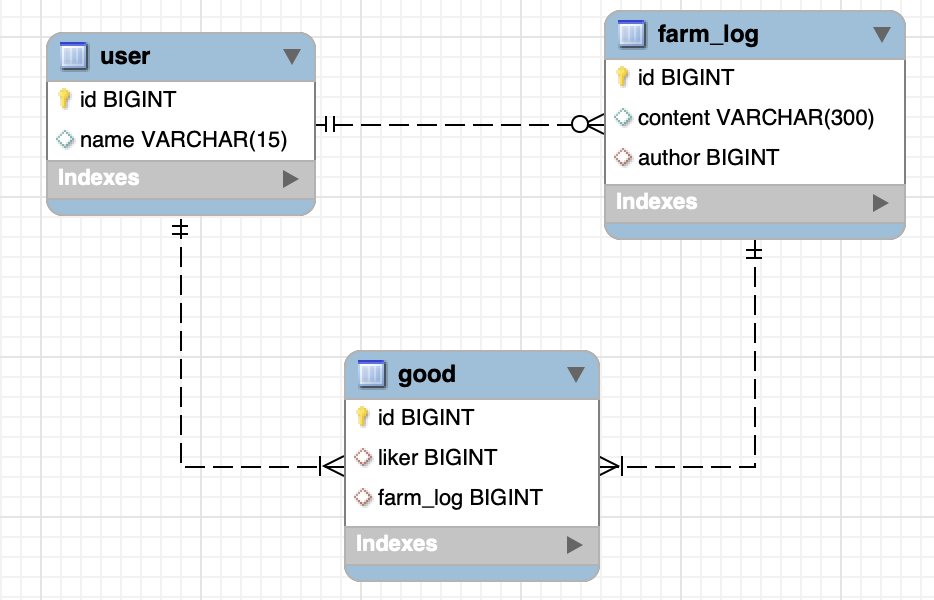
"like" 혹은 "likes"라는 이름의 테이블을 만들고 싶었지만, 쿼리의 예약어로 쓰이기 때문에 "good"이라는 이름으로 대체했다.
# Entity
Good 엔티티 코드이다.
@Entity
@Getter
@Setter
@Builder
@NoArgsConstructor
@AllArgsConstructor
public class Good extends BaseEntity {
    @Id
    @GeneratedValue(strategy = GenerationType.IDENTITY)
    private Long id;

    @ManyToOne
    @JoinColumn(name = "farm_log")
    private FarmLog farmLog;

    @ManyToOne
    @JoinColumn(name = "liker")
    private User liker;
}좋아요 하는 유저 필드는 liker, 좋아요가 눌린 FarmLog 필드는 farm_log로 설정했다. RDB 상에선 각각의 column이 user, farm_log 테이블의 pk가 될 것이다.
연관관계를 표시하기 위해 User, FarmLog 엔티티 클래스에 각각의 필드를 추가했다.
// User.java
// 유저가 좋아요하는 farm 목록
@OneToMany(mappedBy = "liker",
            cascade = CascadeType.ALL,
            fetch = FetchType.LAZY)
private List<Good> likeList;// FarmLog.java
// 좋아요 한 유저 목록
@OneToMany(mappedBy = "farmLog",
cascade = CascadeType.ALL,
fetch = FetchType.LAZY)
private List<Good> likers;
마지막으로 GoodRepository 코드이다. 좋아요 한 사람과 좋아요가 눌린 일기로 엔티티를 찾는 쿼리 하나를 만들었다.
@Repository
public interface GoodRepository extends JpaRepository<Good, Long> {
    public Optional<Good> findByLikerAndFarmLog(User liker, FarmLog farmLog);
}
# Controller & Service
좋아요와 관련된 로직이 있는 컨트롤러 코드이다.
FarmLogController.java :
@Controller
@RequestMapping("farm-log")
@RequiredArgsConstructor
@Slf4j
public class FarmLogController {
    private final FarmLogService farmLogService;

    @GetMapping("/{id}")
    public String showFarmLog(
            HttpServletRequest request,
            @PathVariable Long id,
            Model model) {
        model.addAttribute("farmLog",
                farmLogService.getFarmLogDetail(id));
        model.addAttribute("isLikedByCurrentUser",
                farmLogService.checkIsLikedByCurrentUser(id));
        return "showFarmLog.html";
    }

    @PostMapping("/like/{farmLogId}")
    public String likeFarmLog(@PathVariable("farmLogId")
                                  final Long farmLogId) {
        farmLogService.likeFarmLog(farmLogId);
        return "redirect:/farm-log/"+farmLogId;
    }

    @DeleteMapping("/like/{farmLogId}")
    public String unlikeFarmLog(@PathVariable("farmLogId")
                                    final Long farmLogId) {
        farmLogService.unlikeFarmLog(farmLogId);
        return "redirect:/farm-log/"+farmLogId;
    }
}URL의 path var로 좋아요를 누르고자 하는 farmLog의 ID를 받았다. "/farm-log/{farmLogId}" path로에서 id에 맞는 일기의 상세 정보 페이지를 내놓고, 그곳에서 좋아요를 하거나 취소할 수 있는 버튼을 추가하기로 했다. 좋아요를 누르는 것은 @PostMapping으로, 좋아요를 취소하는 것은 @DeleteMapping으로 요청을 받았다. 상세 페이지 model 객체에 담긴 "isLikedByCurrentuser" boolean값이 view단에서 http method를 결정할 것이다.
다음은 좋아요 로직을 구현한 Service 코드이다.
FarmLogService.java :
@Service
@Slf4j
@RequiredArgsConstructor
public class FarmLogService {
    private final FarmLogRepository farmLogRepository;
    private final UserRepository userRepository;
    private final GoodRepository goodRepository;
    private final HttpSession httpSession;

    @Transactional
    public void likeFarmLog(final Long farmLogId) {
        User sessionUser = getSessionUser();
        FarmLog farmLog = getFarmLogById(farmLogId);
        if (goodRepository.findByLikerAndFarmLog(
                        sessionUser, farmLog)
                .isEmpty()) {
            goodRepository.save(
                    Good.builder()
                            .liker(sessionUser)
                            .farmLog(farmLog)
                            .build());
        }
    }

    @Transactional
    public void unlikeFarmLog(final Long farmLogId) {
        goodRepository.findByLikerAndFarmLog(
                getSessionUser(), getFarmLogById(farmLogId))
                .ifPresent(goodRepository::delete);
    }

    @Transactional
    public Boolean checkIsLikedByCurrentUser(final Long id) {
        if (!isLoggedIn()) return false;
        return goodRepository.findByLikerAndFarmLog(
                getSessionUser(),
                getFarmLogById(id))
                .isPresent();
    }

    @Transactional
    public FarmLog getFarmLogById(Long id) {
        return farmLogRepository.findById(id)
                .orElseThrow(() -> new GreenFarmException(
                        GreenFarmErrorCode.NO_FARM_LOG_ERROR));
    }

    @Transactional
    private User getSessionUser() {
        SessionUser currentUser = (SessionUser) httpSession.getAttribute("user");
        if (currentUser==null) {
            throw new GreenFarmException(GreenFarmErrorCode.NEED_LOGIN);
        }
        String email = currentUser.getEmail();
        return userRepository.findByEmail(email)
                .orElseThrow(() -> new GreenFarmException(GreenFarmErrorCode.NO_USER_ERROR));
    }

    private Boolean isLoggedIn() {
        return httpSession.getAttribute("user")!=null;
    }
}
- likeFarmLog() : 현재 페이지의 일기와 현재 로그인한 유저의 정보로 좋아요 기록을 찾고, 없으면 좋아요 엔티티를 빌드해 저장한다.
- unlikeFarmLog() : 현재 페이지의 일기와 현재 로그인한 유저의 정보로 좋아요 기록을 찾고,있으면 좋아요 엔티티를 삭제한다.
- checkIsLikedByCurrentUser() : 현재 로그인한 유저가 현재 페이지의 일기를 좋아요 했는지 여부를 계산하는 method이다.(로그인 하지 않았으면 default로 false)
# ThymeLeaf ( + extras-springsecurity)
좋아요 기능과 관련된 기능만 하는 버튼 form만 따로 가져와 보았다.
showFarmLog.html :
<form
  class="d-inline"
  sec:authorize="isAuthenticated()"
  th:if="${isLikedByCurrentUser==false}"
  th:action="@{${'/farm-log/like/'+farmLog.farmLogId}}"
  th:method="post"
>
  <button
    th:text="${'♡ '+farmLog.likeNum+' 좋아요'}"
    class="btn btn-outline-success btn-sm"
    type="submit"
  ></button>
</form>

<form
  class="d-inline"
  sec:authorize="isAuthenticated()"
  th:if="${isLikedByCurrentUser==true}"
  th:action="@{${'/farm-log/like/'+farmLog.farmLogId}}"
  th:method="delete"
>
  <button
    th:text="${'♡ '+farmLog.likeNum+' 좋아요 취소'}"
    class="btn btn-success ml-auto btn-sm"
  ></button>
</form>

<button
  sec:authorize="isAnonymous()"
  class="btn btn-outline-success btn-sm"
  th:text="${'♡ '+farmLog.likeNum+' 좋아요'}"
  disabled
></button>- 위의 두 개의 form : isAuthenticated(), 즉 로그인되어 있어야만 보이는 form이다. 같은 action attribute를 갖고 있지만 method가 다르다.
- post : 좋아요를 누르는 버튼으로 submit. isLikedByCurrentUser Boolean값이 false일 때, 즉 좋아요 기록이 없을 때 활성화된다.
- delete : 좋아요를 취소하는 버튼으로 submit. post 버튼과 반대이다.
- 아래의 button : isAnonymous(), 즉 로그인이 되어있지 않은 유저에게 보여지는 disabled 버튼. 단순히 현재 페이지 일기의 좋아요 갯수만 보여지는 기능을 한다.
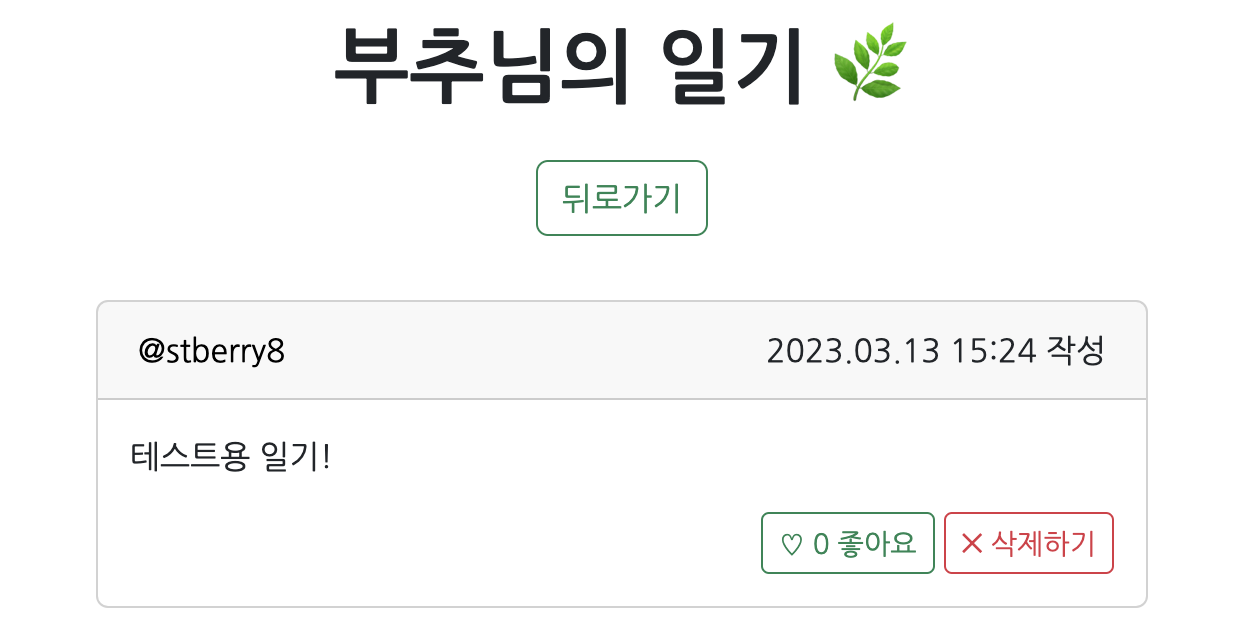
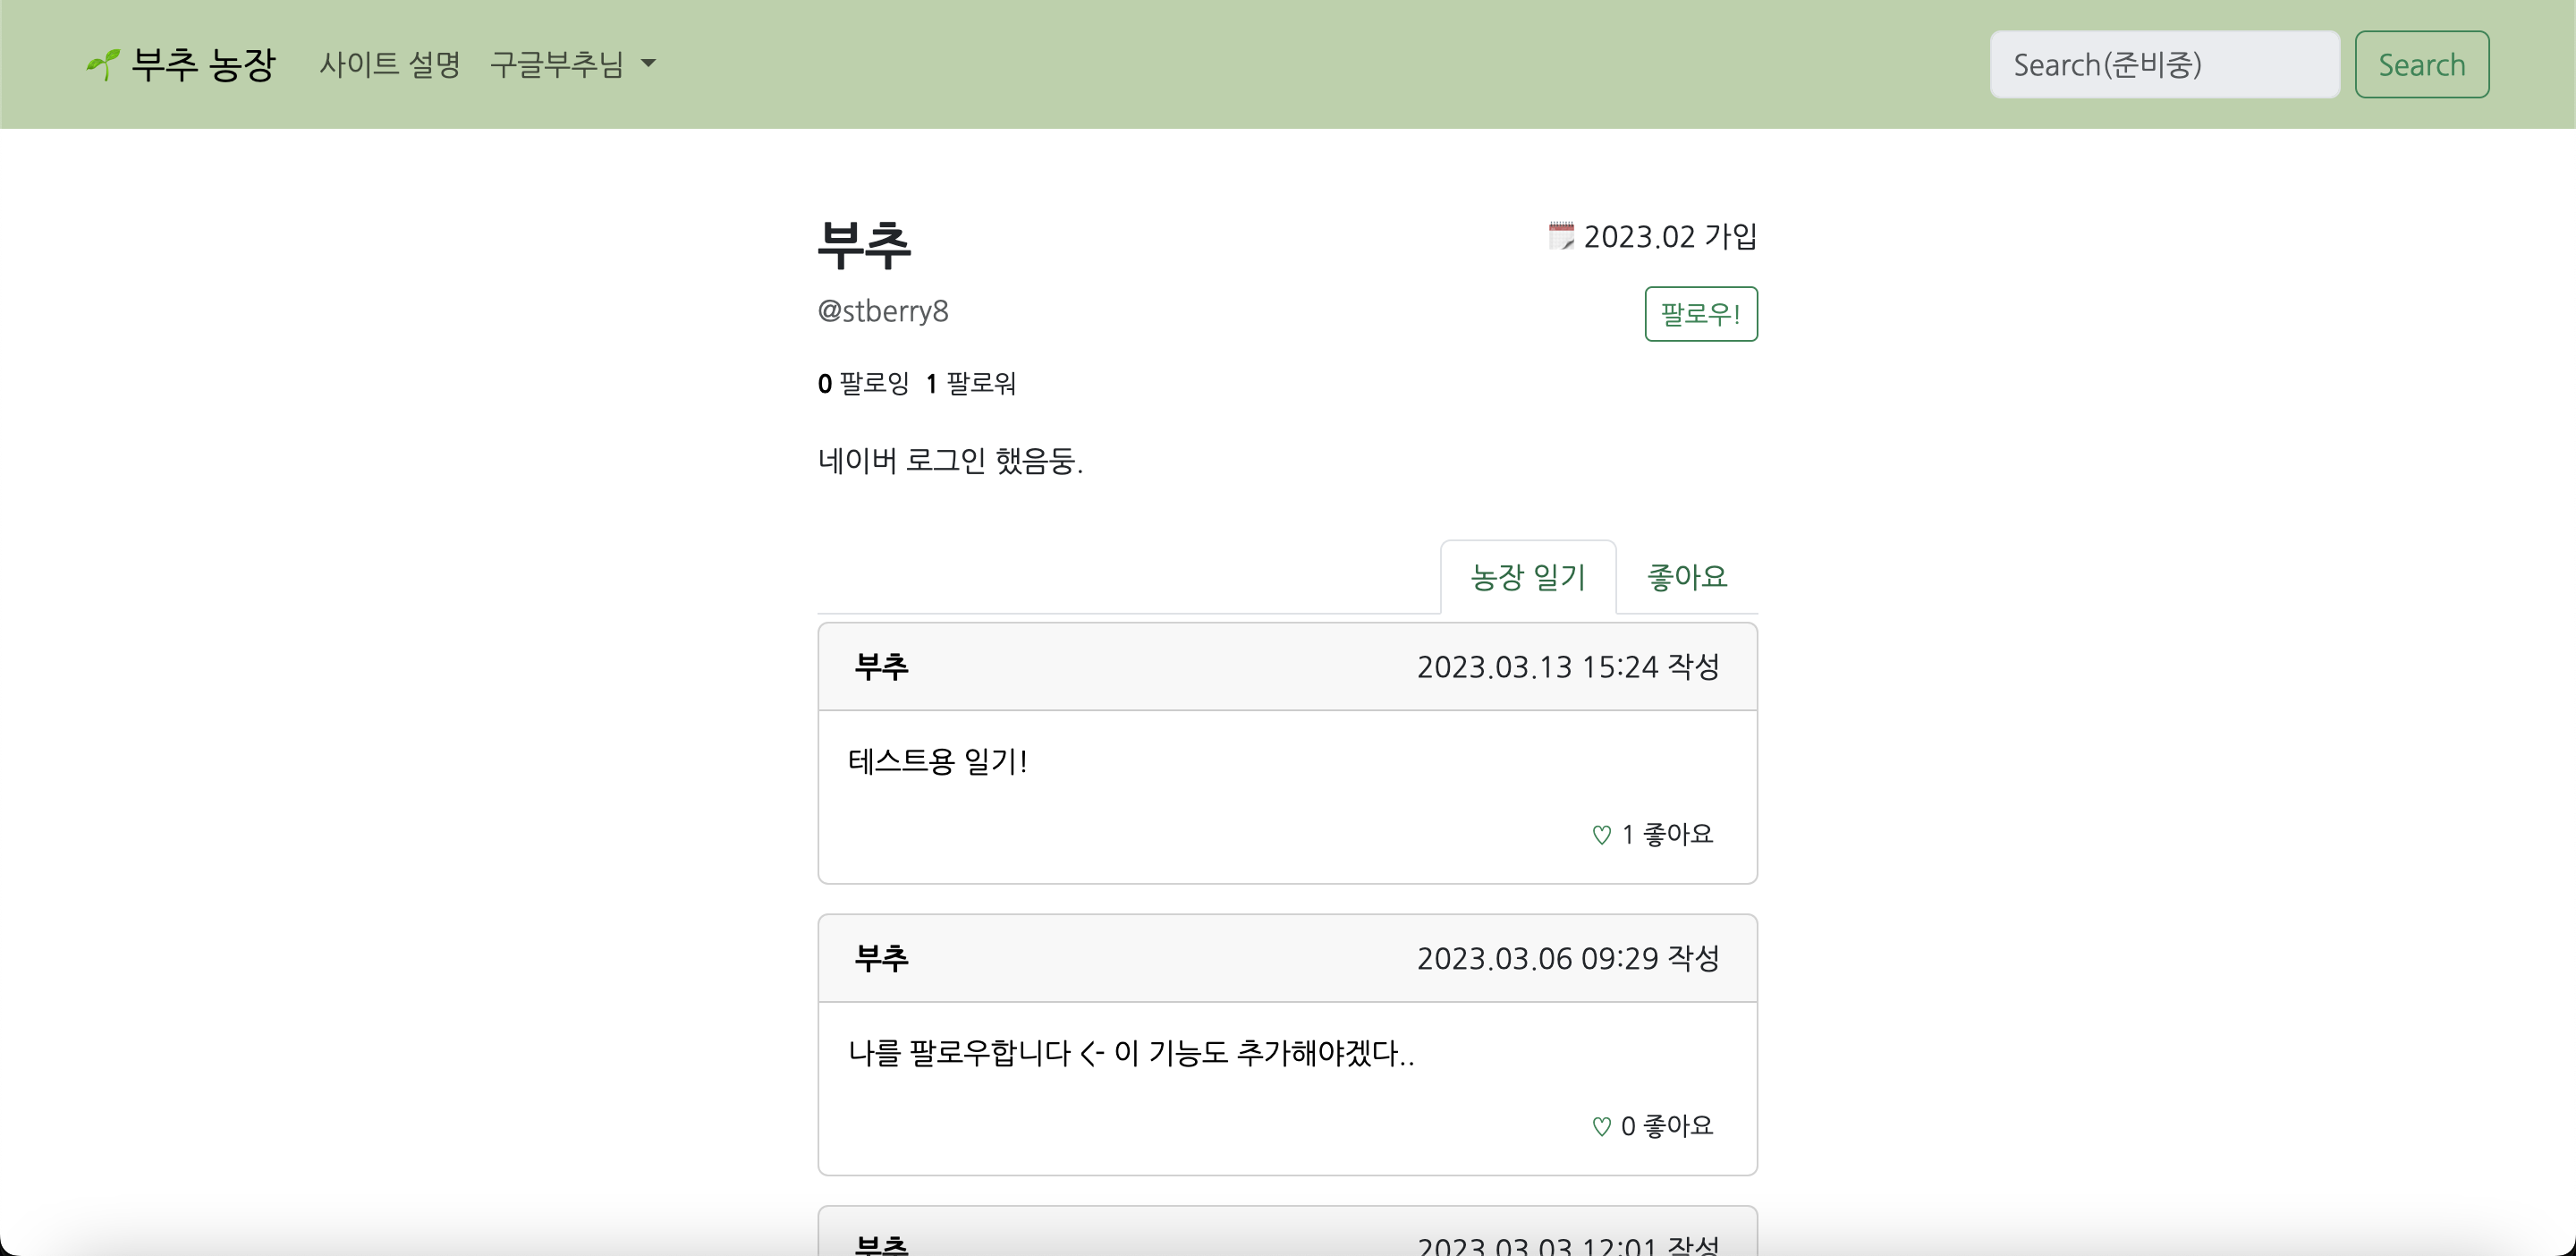
로그인 한 상태에서 일기 하나를 작성했다. 일기의 상세 페이지에 들어갔을 때 보이는 상태이다. 좋아요를 누른 적이 없으므로 thymeleaf 코드의 첫번째 form이 렌더링됐다. 이 상태에서 좋아요 버튼을 누르면,

Hibernate의 Good(좋아요) 테이블에 insert문이 나가고,
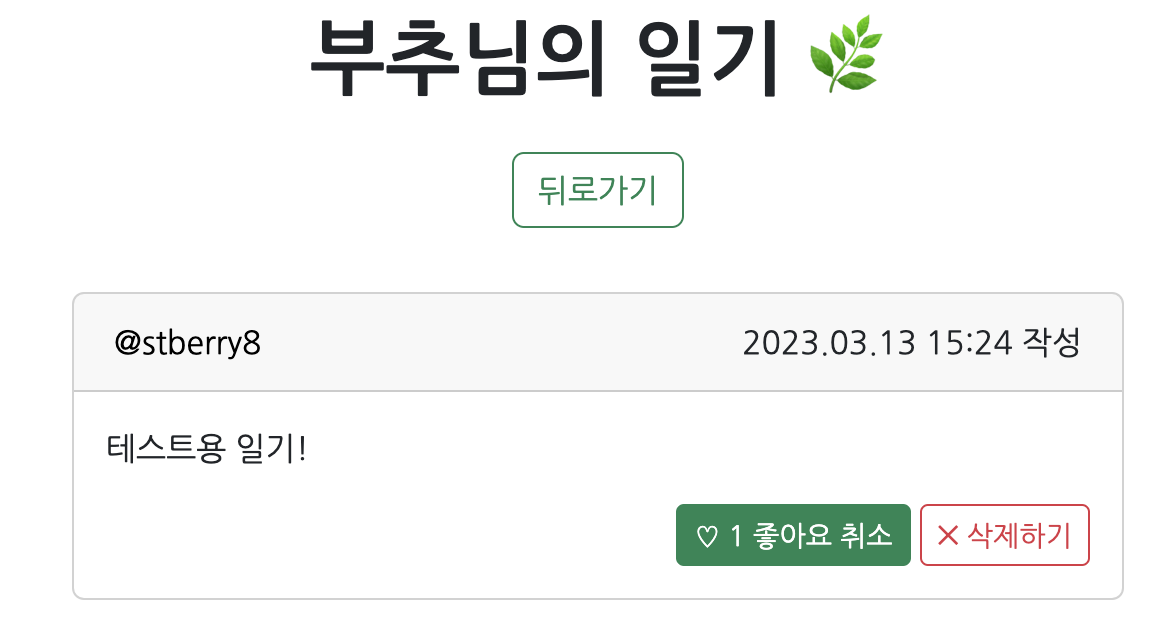
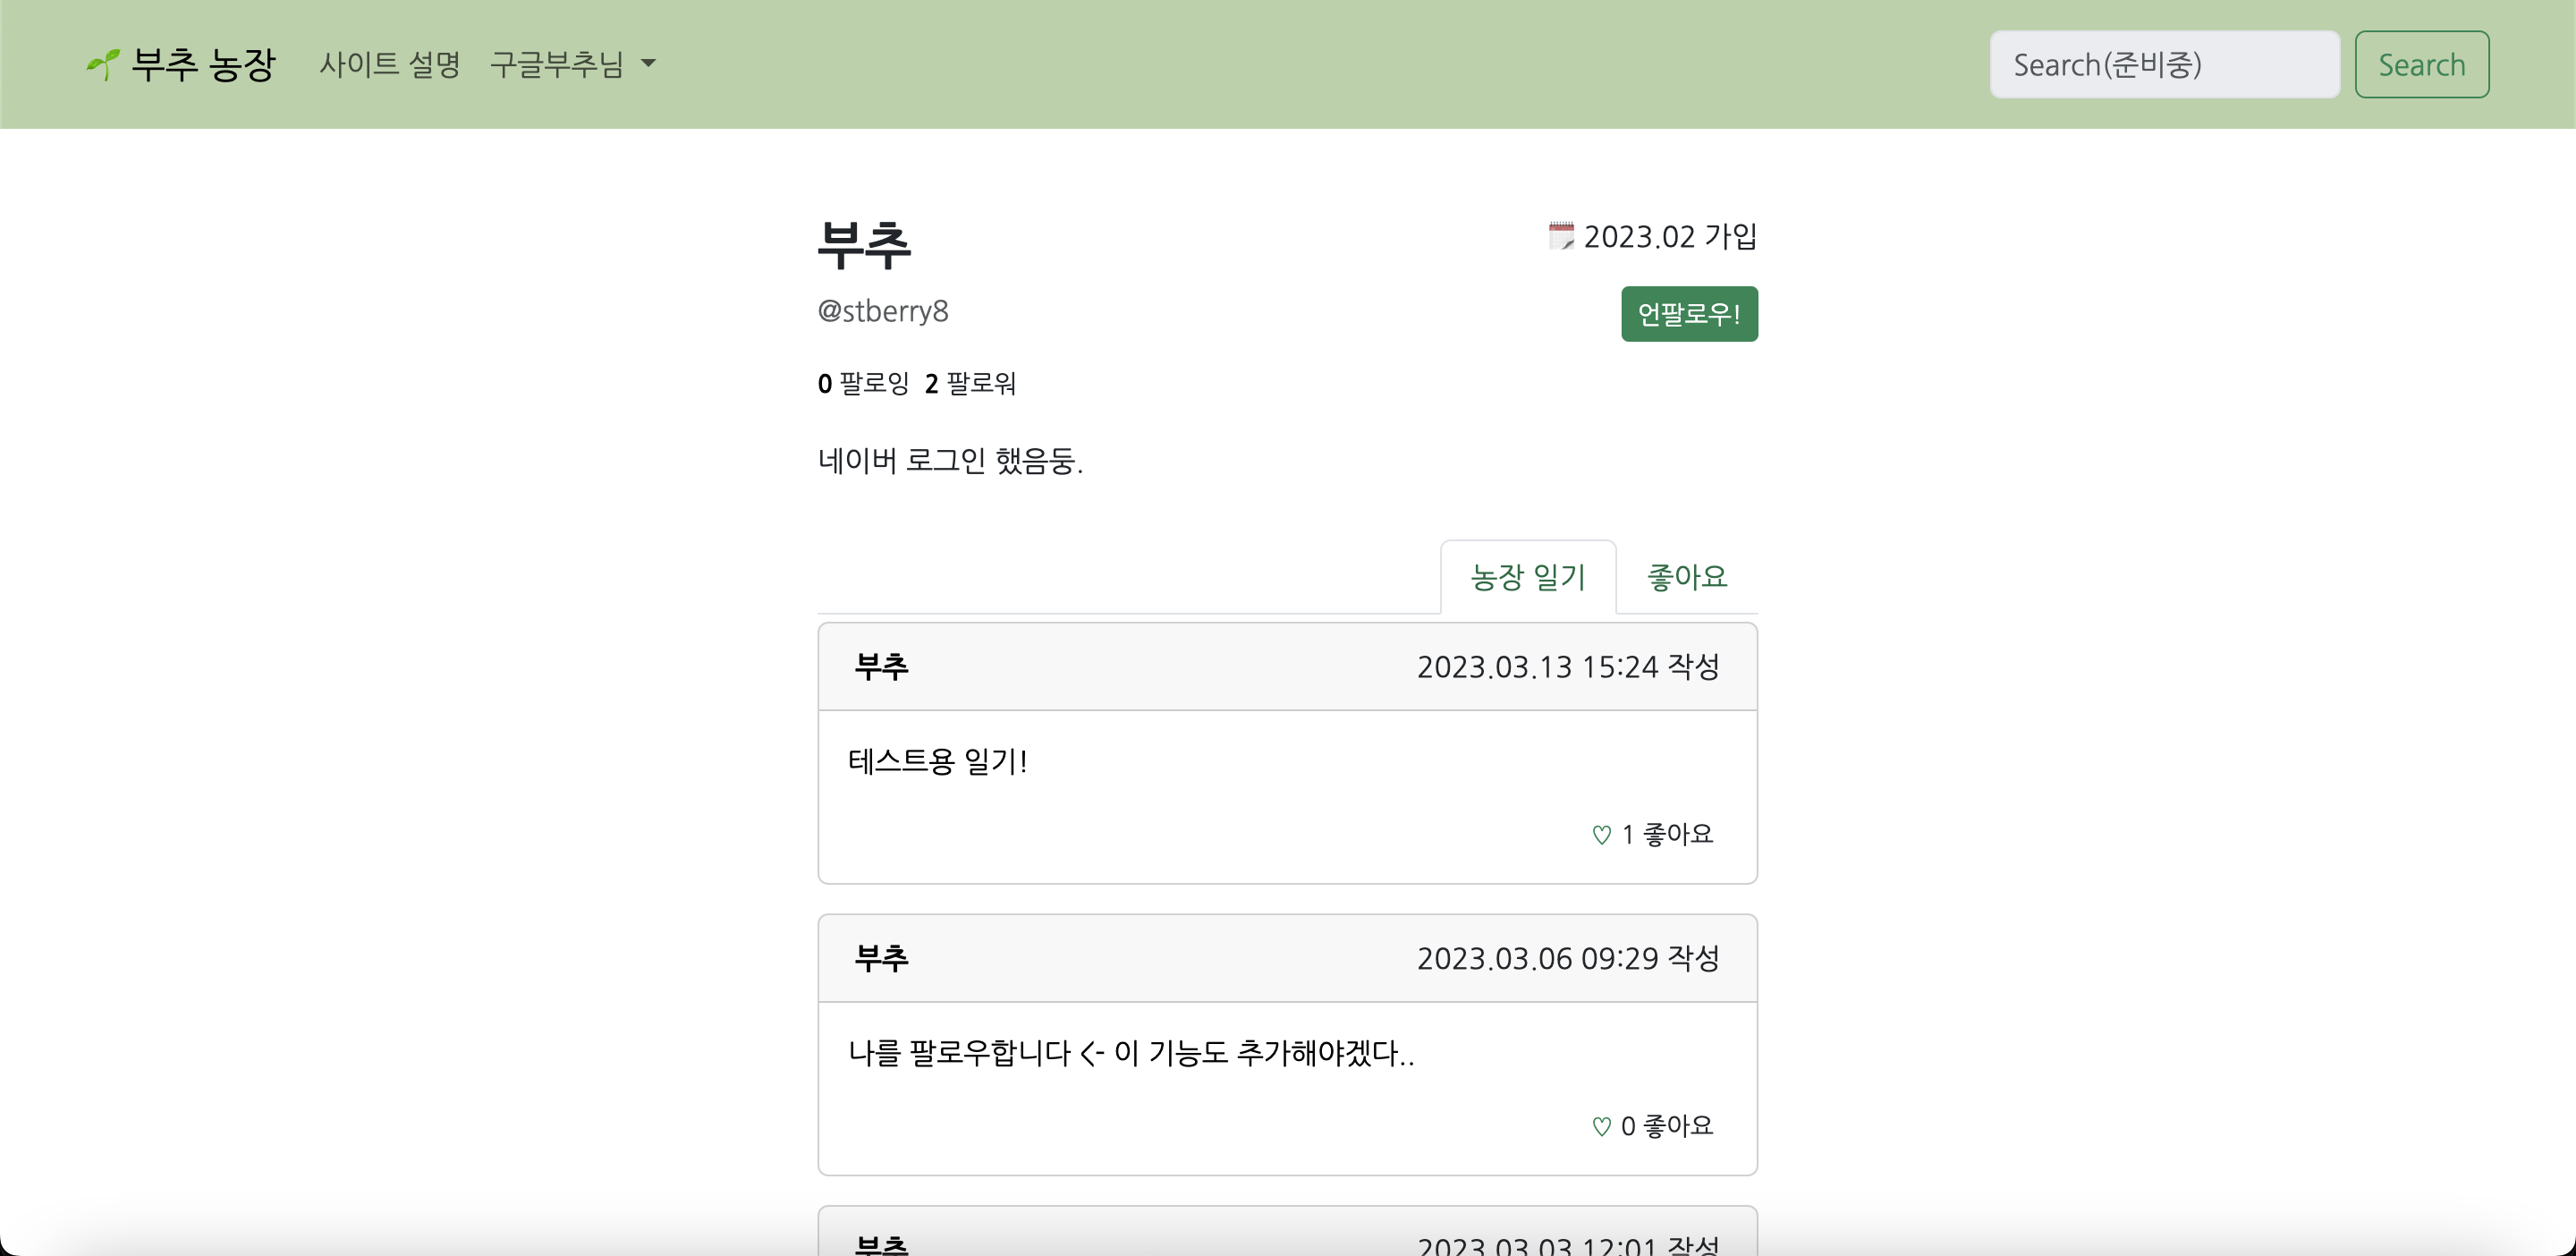
화면에는 "좋아요 취소"가 가능한 두 번째 버튼이 나타나는걸 확인할 수 있다.
3. ManyToMany (M:N) : User들은 서로를 팔로잉 할 수 있다.
하나의 엔티티 안에서 연관관계를 가지는 예시이다. 연관 관계에서 누가 팔로우를 하고 누가 팔로우를 당하는지 확실하게 구분만 하면 사실 2번과 별 차이가 없다. 같은 엔티티 안의 관계는 이를 잘 구분하는 네이밍이 중요하다. ERD는 다음과 같이 바뀐다.
# Entity
follow 연관 테이블을 구성하기 위한 엔티티 코드이다.
follow.java :
@Getter
@Setter
@Builder
@NoArgsConstructor
@AllArgsConstructor
public class Follow extends BaseEntity {
    @Id
    @GeneratedValue(strategy = GenerationType.IDENTITY)
    private Long id;

    @ManyToOne(fetch = FetchType.LAZY)
    @JoinColumn(name = "following")
    private User following;

    @ManyToOne(fetch = FetchType.LAZY)
    @JoinColumn(name = "followed")
    private User followed;
}- following : 해당 팔로우 관계에서 팔로우 "하는" 유저. 해당 유저 페이지의 팔로잉 목록에 표시됨.
- followed : 해당 팔로우 관계에서 팔로우 "당하는" 유저. 해당 유저 페이지의 팔로워 목록에 표시됨.
- 한 쪽 필드의 값만 필요한 쿼리가 다수이므로 FetchType.LAZY를 활용했다.
User 엔티티 코드에도 양방향으로 참조할 수 있는 field를 추가했다.
// 이 유저가 팔로우하고 있는 사람
@OneToMany(mappedBy = "following",
        cascade = CascadeType.ALL,
        fetch = FetchType.LAZY)
private List<Follow> following;

// 이 유저가 팔로우 당하고 있는 사람.. (팔로워!!)
@OneToMany(mappedBy = "followed",
        cascade = CascadeType.ALL,
        fetch = FetchType.LAZY)
private List<Follow> followed;
Repository에는 팔로우 여부를 확인하기 위한 findByFollowingAndFollowed, 팔로워와 팔로잉 목록을 확인하기 위한 findBy~를 추가했다.
followRepository.java :
@Repository
public interface FollowRepository extends JpaRepository<Follow,Long> {
    public List<Follow> findByFollowed(User followed);
    public List<Follow> findByFollowing(User following);
    public Optional<Follow> findByFollowingAndFollowed(User following, User followed);
}
# Controller & Service
UserController.java :
@Controller
@RequiredArgsConstructor
@Slf4j
public class UserController {
    private final UserService userService;
    private final HttpSession httpSession;

    @PostMapping("/{userId}/follow")
    public String followUser(@PathVariable("userId") final String userId) {
        userService.follow(
                getSessionUser().getUserId(),
                userId);
        return "redirect:/"+userId;
    }

    @DeleteMapping("/{userId}/follow")
    public String unfollowUser(@PathVariable("userId") final String userId) {
        userService.unfollow(
                getSessionUser().getUserId(),
                userId);
        return "redirect:/"+userId;
    }

    @GetMapping("/{userId}/following")
    public String getFollowing(@PathVariable("userId") final String userId,
                               Model model) {
        model.addAttribute("user",
                userService.getUserProfileDto(userId));
        model.addAttribute("followings",
                userService.getFollowingUserDto(userId));
        return "following.html";
    }

    @GetMapping("/{userId}/follower")
    public String getFollower(@PathVariable("userId") final String userId,
                               Model model) {
        model.addAttribute("user",
                userService.getUserProfileDto(userId));
        model.addAttribute("followers",
                userService.getFollowerUserDto(userId));
        return "follower.html";
    }

    private SessionUser getSessionUser() {
        return (SessionUser) httpSession.getAttribute("user");
    }
}- followUser() / unfollowUser() : 동일한 path의 http method만 다르게 받았다. Post 요청엔 follow를, delete 요청일땐 unfollow를 실행한다. 가입시에 유저들이 설정한 userId를 쿼리 파라미터로 받았다.
- getFollowing() / getFollower() : path variable에 있는 유저의 팔로잉/팔로워 목록을 불러온다.
- 4개의 경로는 모두 spring security의 filter단에서 authenticated되어야만 접근할 수 있는 경로로 설정했다. 따라서 getSessionUser() 에서 따로 로그인 확인을 진행하지는 않았다.
UserService.java :
@Service
@Slf4j
@RequiredArgsConstructor
public class UserService {
    private final HttpSession httpSession;
    private final UserRepository userRepository;
    private final FollowRepository followRepository;
    @Transactional
    public void follow(final String followingId,
                           final String followedId) {
        User followed = getUserByUserId(followedId);
        User following = getUserByUserId(followingId);
        if (followRepository.findByFollowingAndFollowed(
                following,followed).isEmpty()) {
                followRepository.save(
                        Follow.builder()
                                .following(following)
                                .followed(followed)
                                .build());
        }
    }

    @Transactional
    public void unfollow(final String followingId,
                         final String followedId) {
        followRepository.findByFollowingAndFollowed(
                            getUserByUserId(followingId),
                            getUserByUserId(followedId))
                .ifPresent(followRepository::delete);
    }

    @Transactional
    public List<UserProfileDto> getFollowingUserDto(final String userId) {
        return followRepository.findByFollowing(
                getUserByUserId(userId))
                .stream().map(Follow::getFollowed)
                .map(UserProfileDto::fromEntity)
                .collect(Collectors.toList());
    }

    @Transactional
    public List<UserProfileDto> getFollowerUserDto(final String userId) {
        return followRepository.findByFollowed(
                        getUserByUserId(userId))
                .stream().map(Follow::getFollowing)
                .map(UserProfileDto::fromEntity)
                .collect(Collectors.toList());
    }

    @Transactional
    protected User getUserByUserId(String userId) {
        return userRepository.findByUserId(userId)
                .orElseThrow(() ->new GreenFarmException(
                        GreenFarmErrorCode.NO_USER_ERROR));
    }
}팔로잉과 팔로워 ID를 받아서 팔로우/언팔로우 동작, 팔로잉/팔로워 목록을 가져오는 것을 확인하자.
팔로잉/팔로워 목록에 쓰이는 UserProfileDto는 목록 구성을 위해서 해당 유저의 기본 정보만 받아오는 DTO 클래스이다.
@Builder
@Getter
@Setter
@ToString
@AllArgsConstructor
@NoArgsConstructor
public class UserProfileDto {
    private String userId;
    private String name;
    private String email;
    private String bio;

    public static UserProfileDto fromEntity(User user) {
        return UserProfileDto.builder()
                .userId(user.getUserId())
                .name(user.getName())
                .email(user.getEmail())
                .bio(user.getBio())
                .build();
    }
}
# ThymeLeaf
좋아요 기능을 구현했을 때와 비슷한 포맷이다. 유저의 상세 정보창 페이지에서 팔로우/언팔로우 할 수 있는 기능을 가진 버튼을 구현했다.
<form
  class="d-inline ms-auto"
  sec:authorize="isAuthenticated()"
  th:unless="${isFollowing || session.user.userId==userDetail.userId}"
  th:action="@{'/'+${userDetail.userId}+'/follow'}"
  th:method="post"
>
  <button type="submit" class="btn btn-outline-success btn-sm ms-auto">
    팔로우!
  </button>
</form>
<form
  class="d-inline ms-auto"
  sec:authorize="isAuthenticated()"
  th:if="${isFollowing && session.user.userId!=userDetail.userId}"
  th:action="@{'/'+${userDetail.userId}+'/follow'}"
  th:method="delete"
>
  <button type="submit" class="btn btn-outline-success active btn-sm ms-auto">
    언팔로우!
  </button>
</form>1. 기본적으로 로그인이 되어있어야 하고 (sec:authorize="isAuthenticated()")
2. 로그인한 유저가 현재 유저 상세 페이지의 유저와 달라야 하고 ( session.user.userID!=userDetail.userId )
3. 아직 팔로우 중이 아니여야 한다 ( !isFollowing )
위 세가지 조건을 모두 만족해야만 팔로우 버튼이 활성화되는 식으로 thymeleaf의 태그를 이용했다.
그리고 팔로잉 목록을 볼 수 있는 html 코드도 작성했다. controller에서 List<UserprofileDto> followings로 넘겨준 UserprofileDto들을 th:each로 ul 태그에 담았다.
<ul class="list-group list-group-flush">
  <a
    th:each="following:${followings}"
    class="list-group-item list-group-item-action"
    th:href="${'/'+following.userId}"
  >
    <span th:text="${following.name}" class="fw-bold me-2"></span>
    <span class="text-muted" th:text="${'@' + following.userId}"></span>
    <div class="mt-2">
      <small th:text="${following.bio}"></small>
    </div>
  </a>
</ul>
로그인한 상태로, 팔로우하지 않는 다른 유저의 상세 페이지에 들어가보면 다음과 같이 팔로우 할 수 있는 버튼이 있다.
팔로우 버튼을 누르면, hibernate의 follow 테이블에 insert문이 나가고

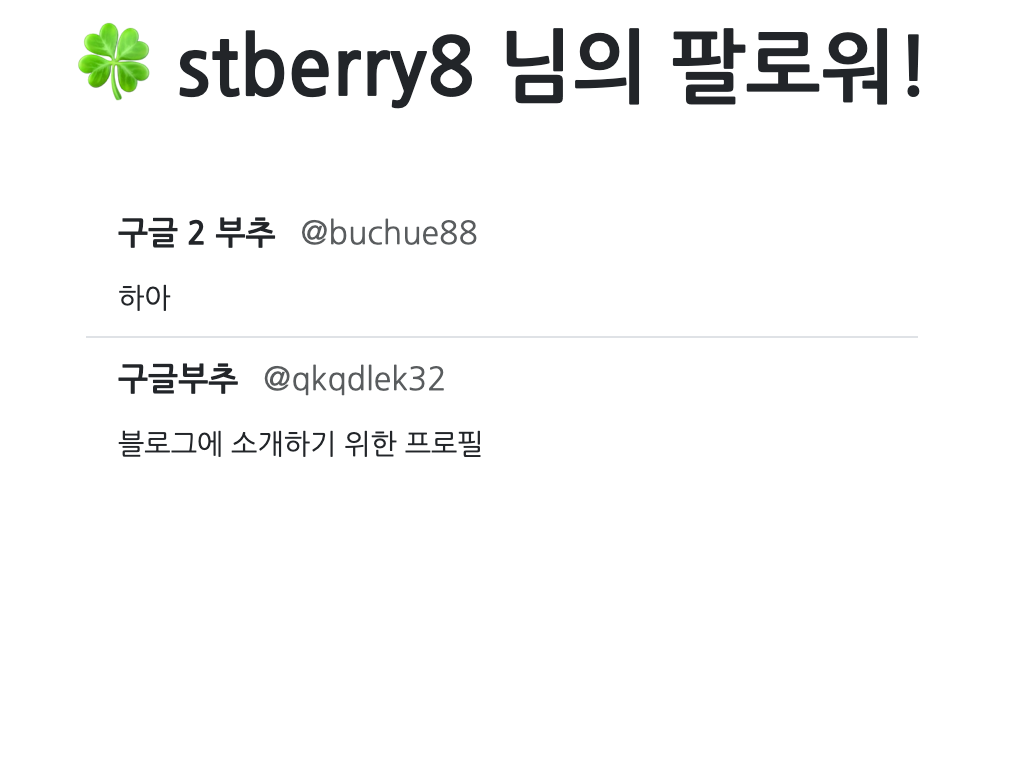
팔로우 버튼이 언팔로우 버튼으로 바뀌었다. 팔로워 숫자도 늘었다. 팔로워 숫자를 누르면 팔로워 목록 페이지로 갈 수 있다. 클릭해보면,
현재 로그인한 유저(구글부추)가 팔로워 목록에 추가되었다.
중요성이 덜한 view 기능이나 DTO 관련한 자잘한 사항들은 포스팅에서 다 뺐다.
프로젝트에서 연관 관계에 대한 설명은 이정도면 충분할 것 같다.
JPA에서 가장 중요한 개념 중 하나인 연관관계를 프로젝트에 적용시켜 볼 것이다. 부추 농장에서 프로젝트에 사용된 연관 관계들이다.
- OneToMany - 1명의 User은 여러 개의 FarmLog들을 가지고 있다.
- ManyToMany - 여러 명의 User가 여러 개의 FarmLog에 좋아요를 누를 수 있다.
- ManyToMany - 여러 명의 User가 서로를 팔로잉(following) 할 수 있다.
가장 위의 관계부터 하나씩 해나가도록 하겠다!
1. OneToMany (1 : N) : 한 명의 User가 여러 개의 FarmLog들을 가지고 있다.
연관 관계에 필요한 property들만 ERD 으로 표시해보았다.
'유저가 작성한 여러 개의 농장 일기가 존재한다'는 연관 관계이다.
# Entity
연관 관계와 관련된 필드만 떼온 User 엔티티 코드이다.
@Entity
@Getter
@Setter
@AllArgsConstructor
@NoArgsConstructor
@Builder
@EntityListeners(AuditingEntityListener.class)
public class User extends BaseEntity {
    @Id
    @GeneratedValue(strategy = GenerationType.IDENTITY)
    private Long id;

    @NotBlank
    @Size(min = 1, max = 15, message = "닉네임이 공란이거나 15자 이상이어선 안됩니다!")
    private String name; // nickname

    // 유저가 가지고 있는 farmLog
    @OneToMany(mappedBy = "author",
            cascade = CascadeType.ALL,
            fetch = FetchType.LAZY)
    private List<FarmLog> farmLog;
}
User 기준으로 farmLog들은 @OneToMany이다. 일단 ~ToMany 연관 관계의 fetchType이 LAZY이긴 하지만 그래도 명시적으로 적어놓았다. [farmLog들은 유저에게 완전 종속되어있다] 설정했기 때문에 CascadeType.ALL을 붙여주었다.
FarmLog 엔티티 클래스를 보자.
@Entity
@Getter
@Setter
@AllArgsConstructor
@NoArgsConstructor
@Builder
@EntityListeners(AuditingEntityListener.class)
public class FarmLog extends BaseEntity {
    @Id
    @GeneratedValue(strategy = GenerationType.IDENTITY)
    private Long farmLogId;

    @NotBlank(message = "내용이 공란이어선 안됩니다.")
    @Size(max = 300, message = "농장 일기는 300자를 넘겨선 안됩니다!")
    private String logContent;

    @ManyToOne(fetch = FetchType.EAGER)
    @JoinColumn(name = "author", updatable = false)
    private User author;
}
@JoinColumn을 붙여주어 이 연관관계의 주인, 즉 fk를 가지고 있는 쪽이 FarmLog 엔티티임을 명시해줬다. 필드 이름은 author이고 이는 User 클래스의 mappedBy와 매칭된다. 일기를 쓴 주인은 수정될 수 없으므로 updatable = false 옵션을 붙였다.
양방향 매핑 + @JoinColumn을 사용한 이유는 아래 블로그 글을 참고하면 좋겠다. 간단하게 말하면 불필요한 객체 검색을 최소화하기 위해서이다.
JPA 일대다 단방향 매핑 잘못 사용하면 벌어지는 일
JPA 일대다 단방향 매핑 잘못 사용하면 벌어지는 일Parent : Child = 1 : N 의 관계가 있으면 일대다 단방향으로 매핑하는 것보다 일대다 양방향으로 매핑하는 것이 좋다. 왜 그런지 구체적으로 살펴보
homoefficio.github.io
# Controller & Service
User와의 연관 관계를 이용한 FarmLog의 CRUD 관련 컨트롤러와 서비스 코드는 아래 글 참조..
2. 농장 일기 CRUD
유저 구현은 아래 글과 똑같은 과정으로 진행했다. OAuth2 적용 (구글) 기본적인 Spring Security 내용과 OAuth2의 동작 방식에 대한 설명 글이다. OAuth에서 사용하는 클라이언트, 리소스 오너, auth 서버,
buchu-doodle.tistory.com
2. ManyToMany (M : N) : 여러 명의 User가 여러 개의 FarmLog에 좋아요를 누른다.
JPA에서 M:N 연관 관계는 @ManyToMany를 쓰는 것보다 양쪽을 참조하는 제 3의 연관 테이블을 따로 두는 편이 훨씬 좋다. 조인 테이블을 직접 추가하는 것이다.
@ManyToMany + @JoinTable 속성을 사용하면 Hibernate가 알아서 join table을 생성해주지만, join table에 추가 속성을 넣을 수 없어 그와 관련된 로직을 처리할 수 없다는 단점이 있다. 이는 여러가지 비즈니스 로직이 필요한 실무에선 치명적이므로, 반드시 join 테이블을 따로 빼야한다.
프로젝트에선 여러 명의 User들이 여러 개의 FarmLog들에게 좋아요를 할 수 있는 상황이다. 여기선 (user, farmLog) 쌍을 가지고 있는 "좋아요" 테이블을 새로 만들어야 할 것이다. 이를 ERD로 그려봤다.
"like" 혹은 "likes"라는 이름의 테이블을 만들고 싶었지만, 쿼리의 예약어로 쓰이기 때문에 "good"이라는 이름으로 대체했다.
# Entity
Good 엔티티 코드이다.
@Entity
@Getter
@Setter
@Builder
@NoArgsConstructor
@AllArgsConstructor
public class Good extends BaseEntity {
    @Id
    @GeneratedValue(strategy = GenerationType.IDENTITY)
    private Long id;

    @ManyToOne
    @JoinColumn(name = "farm_log")
    private FarmLog farmLog;

    @ManyToOne
    @JoinColumn(name = "liker")
    private User liker;
}
좋아요 하는 유저 필드는 liker, 좋아요가 눌린 FarmLog 필드는 farm_log로 설정했다. RDB 상에선 각각의 column이 user, farm_log 테이블의 pk가 될 것이다.
연관관계를 표시하기 위해 User, FarmLog 엔티티 클래스에 각각의 필드를 추가했다.
// User.java
// 유저가 좋아요하는 farm 목록
@OneToMany(mappedBy = "liker",
            cascade = CascadeType.ALL,
            fetch = FetchType.LAZY)
private List<Good> likeList;
// FarmLog.java
// 좋아요 한 유저 목록
@OneToMany(mappedBy = "farmLog",
cascade = CascadeType.ALL,
fetch = FetchType.LAZY)
private List<Good> likers;
마지막으로 GoodRepository 코드이다. 좋아요 한 사람과 좋아요가 눌린 일기로 엔티티를 찾는 쿼리 하나를 만들었다.
@Repository
public interface GoodRepository extends JpaRepository<Good, Long> {
    public Optional<Good> findByLikerAndFarmLog(User liker, FarmLog farmLog);
}
# Controller & Service
좋아요와 관련된 로직이 있는 컨트롤러 코드이다.
FarmLogController.java :
@Controller
@RequestMapping("farm-log")
@RequiredArgsConstructor
@Slf4j
public class FarmLogController {
    private final FarmLogService farmLogService;

    @GetMapping("/{id}")
    public String showFarmLog(
            HttpServletRequest request,
            @PathVariable Long id,
            Model model) {
        model.addAttribute("farmLog",
                farmLogService.getFarmLogDetail(id));
        model.addAttribute("isLikedByCurrentUser",
                farmLogService.checkIsLikedByCurrentUser(id));
        return "showFarmLog.html";
    }

    @PostMapping("/like/{farmLogId}")
    public String likeFarmLog(@PathVariable("farmLogId")
                                  final Long farmLogId) {
        farmLogService.likeFarmLog(farmLogId);
        return "redirect:/farm-log/"+farmLogId;
    }

    @DeleteMapping("/like/{farmLogId}")
    public String unlikeFarmLog(@PathVariable("farmLogId")
                                    final Long farmLogId) {
        farmLogService.unlikeFarmLog(farmLogId);
        return "redirect:/farm-log/"+farmLogId;
    }
}
URL의 path var로 좋아요를 누르고자 하는 farmLog의 ID를 받았다. "/farm-log/{farmLogId}" path로에서 id에 맞는 일기의 상세 정보 페이지를 내놓고, 그곳에서 좋아요를 하거나 취소할 수 있는 버튼을 추가하기로 했다. 좋아요를 누르는 것은 @PostMapping으로, 좋아요를 취소하는 것은 @DeleteMapping으로 요청을 받았다. 상세 페이지 model 객체에 담긴 "isLikedByCurrentuser" boolean값이 view단에서 http method를 결정할 것이다.
다음은 좋아요 로직을 구현한 Service 코드이다.
FarmLogService.java :
@Service
@Slf4j
@RequiredArgsConstructor
public class FarmLogService {
    private final FarmLogRepository farmLogRepository;
    private final UserRepository userRepository;
    private final GoodRepository goodRepository;
    private final HttpSession httpSession;

    @Transactional
    public void likeFarmLog(final Long farmLogId) {
        User sessionUser = getSessionUser();
        FarmLog farmLog = getFarmLogById(farmLogId);
        if (goodRepository.findByLikerAndFarmLog(
                        sessionUser, farmLog)
                .isEmpty()) {
            goodRepository.save(
                    Good.builder()
                            .liker(sessionUser)
                            .farmLog(farmLog)
                            .build());
        }
    }

    @Transactional
    public void unlikeFarmLog(final Long farmLogId) {
        goodRepository.findByLikerAndFarmLog(
                getSessionUser(), getFarmLogById(farmLogId))
                .ifPresent(goodRepository::delete);
    }

    @Transactional
    public Boolean checkIsLikedByCurrentUser(final Long id) {
        if (!isLoggedIn()) return false;
        return goodRepository.findByLikerAndFarmLog(
                getSessionUser(),
                getFarmLogById(id))
                .isPresent();
    }

    @Transactional
    public FarmLog getFarmLogById(Long id) {
        return farmLogRepository.findById(id)
                .orElseThrow(() -> new GreenFarmException(
                        GreenFarmErrorCode.NO_FARM_LOG_ERROR));
    }

    @Transactional
    private User getSessionUser() {
        SessionUser currentUser = (SessionUser) httpSession.getAttribute("user");
        if (currentUser==null) {
            throw new GreenFarmException(GreenFarmErrorCode.NEED_LOGIN);
        }
        String email = currentUser.getEmail();
        return userRepository.findByEmail(email)
                .orElseThrow(() -> new GreenFarmException(GreenFarmErrorCode.NO_USER_ERROR));
    }

    private Boolean isLoggedIn() {
        return httpSession.getAttribute("user")!=null;
    }
}
- likeFarmLog() : 현재 페이지의 일기와 현재 로그인한 유저의 정보로 좋아요 기록을 찾고, 없으면 좋아요 엔티티를 빌드해 저장한다.
- unlikeFarmLog() : 현재 페이지의 일기와 현재 로그인한 유저의 정보로 좋아요 기록을 찾고,있으면 좋아요 엔티티를 삭제한다.
- checkIsLikedByCurrentUser() : 현재 로그인한 유저가 현재 페이지의 일기를 좋아요 했는지 여부를 계산하는 method이다.(로그인 하지 않았으면 default로 false)
# ThymeLeaf ( + extras-springsecurity)
좋아요 기능과 관련된 기능만 하는 버튼 form만 따로 가져와 보았다.
showFarmLog.html :
<form
  class="d-inline"
  sec:authorize="isAuthenticated()"
  th:if="${isLikedByCurrentUser==false}"
  th:action="@{${'/farm-log/like/'+farmLog.farmLogId}}"
  th:method="post"
>
  <button
    th:text="${'♡ '+farmLog.likeNum+' 좋아요'}"
    class="btn btn-outline-success btn-sm"
    type="submit"
  ></button>
</form>

<form
  class="d-inline"
  sec:authorize="isAuthenticated()"
  th:if="${isLikedByCurrentUser==true}"
  th:action="@{${'/farm-log/like/'+farmLog.farmLogId}}"
  th:method="delete"
>
  <button
    th:text="${'♡ '+farmLog.likeNum+' 좋아요 취소'}"
    class="btn btn-success ml-auto btn-sm"
  ></button>
</form>

<button
  sec:authorize="isAnonymous()"
  class="btn btn-outline-success btn-sm"
  th:text="${'♡ '+farmLog.likeNum+' 좋아요'}"
  disabled
></button>- 위의 두 개의 form : isAuthenticated(), 즉 로그인되어 있어야만 보이는 form이다. 같은 action attribute를 갖고 있지만 method가 다르다.
- post : 좋아요를 누르는 버튼으로 submit. isLikedByCurrentUser Boolean값이 false일 때, 즉 좋아요 기록이 없을 때 활성화된다.
- delete : 좋아요를 취소하는 버튼으로 submit. post 버튼과 반대이다.
- 아래의 button : isAnonymous(), 즉 로그인이 되어있지 않은 유저에게 보여지는 disabled 버튼. 단순히 현재 페이지 일기의 좋아요 갯수만 보여지는 기능을 한다.
로그인 한 상태에서 일기 하나를 작성했다. 일기의 상세 페이지에 들어갔을 때 보이는 상태이다. 좋아요를 누른 적이 없으므로 thymeleaf 코드의 첫번째 form이 렌더링됐다. 이 상태에서 좋아요 버튼을 누르면,
Hibernate의 Good(좋아요) 테이블에 insert문이 나가고,
화면에는 "좋아요 취소"가 가능한 두 번째 버튼이 나타나는걸 확인할 수 있다.
3. ManyToMany (M:N) : User들은 서로를 팔로잉 할 수 있다.
하나의 엔티티 안에서 연관관계를 가지는 예시이다. 연관 관계에서 누가 팔로우를 하고 누가 팔로우를 당하는지 확실하게 구분만 하면 사실 2번과 별 차이가 없다. 같은 엔티티 안의 관계는 이를 잘 구분하는 네이밍이 중요하다. ERD는 다음과 같이 바뀐다.
# Entity
follow 연관 테이블을 구성하기 위한 엔티티 코드이다.
follow.java :
@Getter
@Setter
@Builder
@NoArgsConstructor
@AllArgsConstructor
public class Follow extends BaseEntity {
    @Id
    @GeneratedValue(strategy = GenerationType.IDENTITY)
    private Long id;

    @ManyToOne(fetch = FetchType.LAZY)
    @JoinColumn(name = "following")
    private User following;

    @ManyToOne(fetch = FetchType.LAZY)
    @JoinColumn(name = "followed")
    private User followed;
}- following : 해당 팔로우 관계에서 팔로우 "하는" 유저. 해당 유저 페이지의 팔로잉 목록에 표시됨.
- followed : 해당 팔로우 관계에서 팔로우 "당하는" 유저. 해당 유저 페이지의 팔로워 목록에 표시됨.
- 한 쪽 필드의 값만 필요한 쿼리가 다수이므로 FetchType.LAZY를 활용했다.
User 엔티티 코드에도 양방향으로 참조할 수 있는 field를 추가했다.
// 이 유저가 팔로우하고 있는 사람
@OneToMany(mappedBy = "following",
        cascade = CascadeType.ALL,
        fetch = FetchType.LAZY)
private List<Follow> following;

// 이 유저가 팔로우 당하고 있는 사람.. (팔로워!!)
@OneToMany(mappedBy = "followed",
        cascade = CascadeType.ALL,
        fetch = FetchType.LAZY)
private List<Follow> followed;
Repository에는 팔로우 여부를 확인하기 위한 findByFollowingAndFollowed, 팔로워와 팔로잉 목록을 확인하기 위한 findBy~를 추가했다.
followRepository.java :
@Repository
public interface FollowRepository extends JpaRepository<Follow,Long> {
    public List<Follow> findByFollowed(User followed);
    public List<Follow> findByFollowing(User following);
    public Optional<Follow> findByFollowingAndFollowed(User following, User followed);
}
# Controller & Service
UserController.java :
@Controller
@RequiredArgsConstructor
@Slf4j
public class UserController {
    private final UserService userService;
    private final HttpSession httpSession;

    @PostMapping("/{userId}/follow")
    public String followUser(@PathVariable("userId") final String userId) {
        userService.follow(
                getSessionUser().getUserId(),
                userId);
        return "redirect:/"+userId;
    }

    @DeleteMapping("/{userId}/follow")
    public String unfollowUser(@PathVariable("userId") final String userId) {
        userService.unfollow(
                getSessionUser().getUserId(),
                userId);
        return "redirect:/"+userId;
    }

    @GetMapping("/{userId}/following")
    public String getFollowing(@PathVariable("userId") final String userId,
                               Model model) {
        model.addAttribute("user",
                userService.getUserProfileDto(userId));
        model.addAttribute("followings",
                userService.getFollowingUserDto(userId));
        return "following.html";
    }

    @GetMapping("/{userId}/follower")
    public String getFollower(@PathVariable("userId") final String userId,
                               Model model) {
        model.addAttribute("user",
                userService.getUserProfileDto(userId));
        model.addAttribute("followers",
                userService.getFollowerUserDto(userId));
        return "follower.html";
    }

    private SessionUser getSessionUser() {
        return (SessionUser) httpSession.getAttribute("user");
    }
}- followUser() / unfollowUser() : 동일한 path의 http method만 다르게 받았다. Post 요청엔 follow를, delete 요청일땐 unfollow를 실행한다. 가입시에 유저들이 설정한 userId를 쿼리 파라미터로 받았다.
- getFollowing() / getFollower() : path variable에 있는 유저의 팔로잉/팔로워 목록을 불러온다.
- 4개의 경로는 모두 spring security의 filter단에서 authenticated되어야만 접근할 수 있는 경로로 설정했다. 따라서 getSessionUser() 에서 따로 로그인 확인을 진행하지는 않았다.
UserService.java :
@Service
@Slf4j
@RequiredArgsConstructor
public class UserService {
    private final HttpSession httpSession;
    private final UserRepository userRepository;
    private final FollowRepository followRepository;
    @Transactional
    public void follow(final String followingId,
                           final String followedId) {
        User followed = getUserByUserId(followedId);
        User following = getUserByUserId(followingId);
        if (followRepository.findByFollowingAndFollowed(
                following,followed).isEmpty()) {
                followRepository.save(
                        Follow.builder()
                                .following(following)
                                .followed(followed)
                                .build());
        }
    }

    @Transactional
    public void unfollow(final String followingId,
                         final String followedId) {
        followRepository.findByFollowingAndFollowed(
                            getUserByUserId(followingId),
                            getUserByUserId(followedId))
                .ifPresent(followRepository::delete);
    }

    @Transactional
    public List<UserProfileDto> getFollowingUserDto(final String userId) {
        return followRepository.findByFollowing(
                getUserByUserId(userId))
                .stream().map(Follow::getFollowed)
                .map(UserProfileDto::fromEntity)
                .collect(Collectors.toList());
    }

    @Transactional
    public List<UserProfileDto> getFollowerUserDto(final String userId) {
        return followRepository.findByFollowed(
                        getUserByUserId(userId))
                .stream().map(Follow::getFollowing)
                .map(UserProfileDto::fromEntity)
                .collect(Collectors.toList());
    }

    @Transactional
    protected User getUserByUserId(String userId) {
        return userRepository.findByUserId(userId)
                .orElseThrow(() ->new GreenFarmException(
                        GreenFarmErrorCode.NO_USER_ERROR));
    }
}
팔로잉과 팔로워 ID를 받아서 팔로우/언팔로우 동작, 팔로잉/팔로워 목록을 가져오는 것을 확인하자.
팔로잉/팔로워 목록에 쓰이는 UserProfileDto는 목록 구성을 위해서 해당 유저의 기본 정보만 받아오는 DTO 클래스이다.
@Builder
@Getter
@Setter
@ToString
@AllArgsConstructor
@NoArgsConstructor
public class UserProfileDto {
    private String userId;
    private String name;
    private String email;
    private String bio;

    public static UserProfileDto fromEntity(User user) {
        return UserProfileDto.builder()
                .userId(user.getUserId())
                .name(user.getName())
                .email(user.getEmail())
                .bio(user.getBio())
                .build();
    }
}
# ThymeLeaf
좋아요 기능을 구현했을 때와 비슷한 포맷이다. 유저의 상세 정보창 페이지에서 팔로우/언팔로우 할 수 있는 기능을 가진 버튼을 구현했다.
<form
  class="d-inline ms-auto"
  sec:authorize="isAuthenticated()"
  th:unless="${isFollowing || session.user.userId==userDetail.userId}"
  th:action="@{'/'+${userDetail.userId}+'/follow'}"
  th:method="post"
>
  <button type="submit" class="btn btn-outline-success btn-sm ms-auto">
    팔로우!
  </button>
</form>
<form
  class="d-inline ms-auto"
  sec:authorize="isAuthenticated()"
  th:if="${isFollowing && session.user.userId!=userDetail.userId}"
  th:action="@{'/'+${userDetail.userId}+'/follow'}"
  th:method="delete"
>
  <button type="submit" class="btn btn-outline-success active btn-sm ms-auto">
    언팔로우!
  </button>
</form>
1. 기본적으로 로그인이 되어있어야 하고 (sec:authorize="isAuthenticated()")
2. 로그인한 유저가 현재 유저 상세 페이지의 유저와 달라야 하고 ( session.user.userID!=userDetail.userId )
3. 아직 팔로우 중이 아니여야 한다 ( !isFollowing )
위 세가지 조건을 모두 만족해야만 팔로우 버튼이 활성화되는 식으로 thymeleaf의 태그를 이용했다.
그리고 팔로잉 목록을 볼 수 있는 html 코드도 작성했다. controller에서 List<UserprofileDto> followings로 넘겨준 UserprofileDto들을 th:each로 ul 태그에 담았다.
<ul class="list-group list-group-flush">
  <a
    th:each="following:${followings}"
    class="list-group-item list-group-item-action"
    th:href="${'/'+following.userId}"
  >
    <span th:text="${following.name}" class="fw-bold me-2"></span>
    <span class="text-muted" th:text="${'@' + following.userId}"></span>
    <div class="mt-2">
      <small th:text="${following.bio}"></small>
    </div>
  </a>
</ul>
로그인한 상태로, 팔로우하지 않는 다른 유저의 상세 페이지에 들어가보면 다음과 같이 팔로우 할 수 있는 버튼이 있다.
팔로우 버튼을 누르면, hibernate의 follow 테이블에 insert문이 나가고
팔로우 버튼이 언팔로우 버튼으로 바뀌었다. 팔로워 숫자도 늘었다. 팔로워 숫자를 누르면 팔로워 목록 페이지로 갈 수 있다. 클릭해보면,
현재 로그인한 유저(구글부추)가 팔로워 목록에 추가되었다.
중요성이 덜한 view 기능이나 DTO 관련한 자잘한 사항들은 포스팅에서 다 뺐다.
프로젝트에서 연관 관계에 대한 설명은 이정도면 충분할 것 같다.